No products in the cart.
All products
 DISCORD
Oh, rolling joints– an ultimate stoner skill that looks as good as it can make you feel!
We, potheads, share the same dream: a smooth, slow, enjoyable roll like the gods of weed created it, no?
But for many, the process of rolling a joint seems like a lot of mess!
One bad move, and you’re left with a half-burnt roll, wasted weed, or even worse of all– a joint that doesn’t stay lit!
This is what we call a real buzzkill!
Of course, not every joint you roll is going to be Insta-worthy, specifically when you are a newbie. But it’s not even rocket science!
What it takes is some practice, time, sometimes mistakes, and, of course, rolling tips and tricks!
That is why, in this guide, we are breaking it all down for you to help you take your rolling game to perfection.
So, grab your papers, and your favourite strain, and let’s roll up!
What You’ll Need to Get Started?
We know some first-timers will be reading the blog too! So, let’s begin with the basics- a joint-rolling starter pack! Here’s a list of things you’ll need:
1. Your Favourite Bud
No matter whether you’re grabbing your regular strain or trying something new, make sure it’s properly dried and ready to be ground.
Fresh, sticky buds are great, but they can be tough to work with. So, aim for a good, dry consistency that will grind easily.
For those who find it a little troubling to pick the perfect strain, don’t worry! We have 15 popular weed strains for you to try! So, no stress—pick one, spark it up, and let the good vibes roll!
2. A Grinder
A weed that is grounded up to a consistent texture not only makes the rolling process much easier but also ensures a smoother burn.
Sure, you can break it down by hand, but a grinder is a must-have if you are aiming for a tight, burnable joint. The bonus part- no sticky fingers!

3. Rolling Papers

The options are endless when it comes to rolling papers: rice, hemp, or flax– each offering its unique features. If you’re a beginner, thinner papers are usually better, as they require less skill to handle.
But, be sure you pick quality papers as cheap ones can make your joint burn too fast or unevenly.
Beginners take note- classic size (1 ¼”) is a good place to start!
And, when talking about rolling papers, we got you a colossal variety at The Green Ace. Click here, explore the variety, and grab your favourite pack of weed wraps!
| Pro tip: Start with regular-sized papers before graduating to king-size—it’s like training wheels for your roll game. |
4. A Filter Tip

Also known as crutch or roach, a filter tip isn’t strictly necessary! But, my friend, it does save your lips, keeps the roach stable, and stops loose bits from flying into your mouth.
Also, it makes your roll easier to hold!
You can buy pre-made ones or easily make your own by rolling up a small piece of cardboard.
5. A Rolling Tray

Though not mandatory, a rolling tray can save your precious bud from getting wasted. It keeps everything in place and catches any stray bits of weed that fall out of your rolling paper.
| Pro Tip: A flat surface is a must, whether it’s your kitchen table, a rolling tray, or even your desk, to ensure you have control over your rolling process! |
6. A Buzzing Vibe to Kick Things Up!
And the most important thing? Why not vibe out while you are at it? How about a laid-back playlist with some epic stoner songs to get you in the zone? Sounds perfect, right?
And don’t waste your time looking out for some insane stoner songs, we got you a trippy playlist to listen to when getting high on those punch-packed puffs.
And, pals, don’t forget to carry a lighter!
Prepping Your Weed

Alright, now that we are done with the essentials, let’s prep your pot. You might think all you need to do is grab a nug and start rolling, but there’s so much more to the story!
Let’s get into it!
1. If your bud has stems or seeds, pick them out.
2. Now, grab that grinder, toss your bud into it, give it a few twists, and voila–you get a fine consistency– not too chunky nor too powdery!
| Alternatives for a grinder? You can use a coffee grinder, scissors, grater, blender, or even your fingers! |
3. Check the texture! It should feel soft but not damp and not powdered into dust.
4. Prep only the quantity that you need for your joint. If you grind too much and let it sit, it can dry out and lose potency.
| Craving an extra kick? If you are a regular joint roller, you would have probably got some kief collected, right? So, why not sprinkle a little on top of your ground weed for that extra punch? |
5. And there you go with your weed, ready to roll!
Rolling A Joint Step-By-Step
Let’s break it down step-by-step on how to perfectly roll a joint!
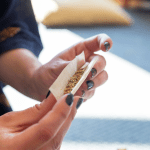
Step 1: Make a Filter

Picture Credit: Pinterest
- Now that you have grind your weed well, it’s time to make a filter.
- Take a small strip of stiff paper and roll it into a small cylindrical shape as tightly as possible.
- You can also fold the edges of the paper into a zig-zag pattern before rolling it into the cylinder for that extra stability (this creates an “M” shape, which is an accordion-style filter).
| For someone who finds DIYing a filter hard from some old-school cardboard, you can purchase pre-rolled filter tips or glass filters from any local store! |
Step 2: Lay Out the Rolling Paper
- This is where your joint will come to life, so start with a clean setup.
- Place your rolling paper on a flat surface or a rolling tray.
- Ensure the sticky edge faces you, and the filter is placed at one end of the paper.
| You can use a rolling tray to avoid spills and keep everything contained. |
Step 3: Load the Paper with Weed

- Sprinkle your ground weed evenly across the length of the paper and leave a little room at the tip for twisting later.
- For a standard joint, about 0.5g to 1g of weed is ideal. You can add more or less depending on your preference.
- Leave a little space at both ends, making it easier to shape the joint and twist it closed later.
Step 4: Shape the Joint

- Now that the weed is in the paper, it’s time to shape it.
- Gently pinch the paper between your fingers and roll it back and forth, shaping the weed into a snug cylinder.
- You’re not fully rolling it yet, just prepping it for the next step.
- Remember, you want it snug but not overpacked! If there are gaps or uneven spots, add a little more weed and reshape it.
Step 5: Tuck and Roll
- Start at the filter end and tuck the unglued edge of the paper under the weed.
- Slowly roll it up, keeping the paper tight as you go. The key is to keep the weed snug and paper stretched as you roll it upward.
- Remember, the tighter you roll, the better it’ll burn.
- Don’t rush this part—it’s all about finesse! It may take a few tries, but the more you do it, the easier it gets!
Step 6: Seal the Deal

- A solid seal ensures that your joint stays together, burns evenly, and doesn’t fall apart mid-session.
- Lick the sticky edge of the paper and press it down firmly to seal the joint.
- Be gentle, though—you want just enough moisture to make the paper stick but not so much that it gets soggy.
Step 7: Pack the Tip
- So, once the joint is rolled, use a pen or a chopstick to gently pack the open end.
- This step keeps everything tight and secure.
- If you have a little extra weed, add it here to top off your joint, then twist the end closed.
Step 8: Time to Light it Up

You have made it, finally! Now is the time to light it up. Hold the joint to your lips, light the twisted end, and gently inhale as the flame touches the paper.
| Rotate the joint while lighting to ensure an even burn. |
Tools to Make Rolling Easier:
Joint Rollers
For someone who is just starting out, understanding how to roll a joint with a joint roller is the best way to get perfect results without frustration.
Pre-Rolled Cones
If you are not just feeling this whole rolling process, grab a pre-rolled cone. All you need to do is fill it up, twist the end, and you are good to go! At The Green Ace, we have so many options:

Tips to Make the Most of Your Roll
1. A good roll starts with a good weed, so opt for high-quality, fresh, and aromatic buds.
2. Beginners can use oregano or tea to practice their roll game without wasting weed.
3. Experiment with flavoured papers for an extra kick.
4. If you feel your rolling paper is a bit dry, soften it up by lightly running it between your fingers or give it a quick breath of warm air.
5. Distribute your weed evenly, as uneven piles lead to canoeing (one side burning faster than the other).
Wrapping It Up
Alright, we hope this little crash course helped you learn how to roll a joint in the simplest way possible. Rolling is a skill anyone can learn; once you’ve got it down, it’s incredibly pleasurable.
We have walked you through every step, from grinding with consistency to sealing the roll perfectly, so you get closer more and more to the flawless, slow-burning beauty we all dream of.
So, let’s get rolling because nothing can beat that first smooth puff of a joint rolled by your own hands!
Happy rolling, my buddy!